
Programming Arduino Nano in C Language
Objective
To program Arduino Nano hardware in C language using built-in Bootloader
Environment
- MS WIndows 7 Professional K (64-bit)
- Atmel Studio 6.2
- Arduino IDE 1.6.1 (avrdude 6.0.1 only)
- Arduino Nano or Clone
Install or Update FT232R Driver for WIndows 7
An FT232R chip is used on Arduino Nano module to convert ATmega328p UART signal to USB at PC. A Virtual Comport Driver (VCP) must be installed on PC for the proper operation of this chip. The name of the driver (current version) is CDM v2.12.00 WHQL Certified.exe.
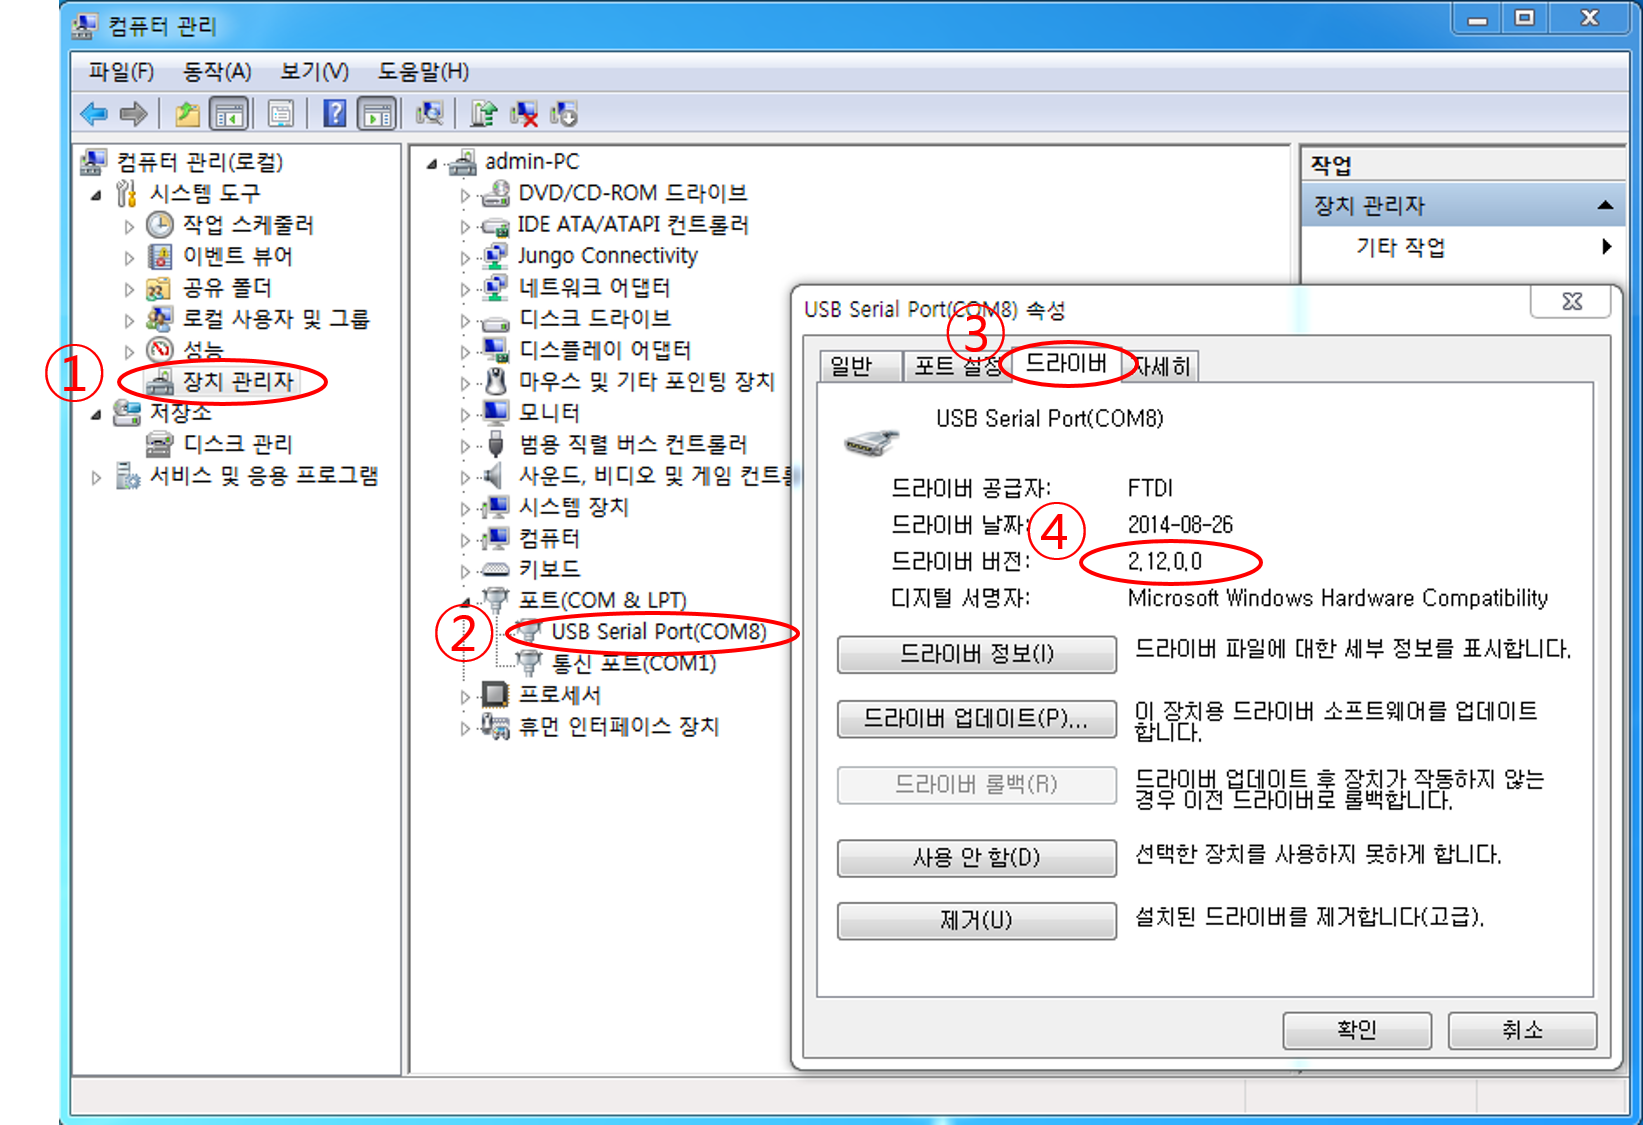
Visit FTDI official site and download the VCP driver for MS Windows. Install the driver by double clicking the downloaded file. The version number of the driver (2.12.0.0) can be checked through MS Windows "Device Manager".
Programming ATmega328P Bootloader
The Bootloader area of ATmega328P Flash memory can be programmed using AVRISP or similar tools. Use bootloader hex file provided with Arduino IDE.
1. Start AVR Studio 4. (Version 4.15.623 was used in this tutorial.)
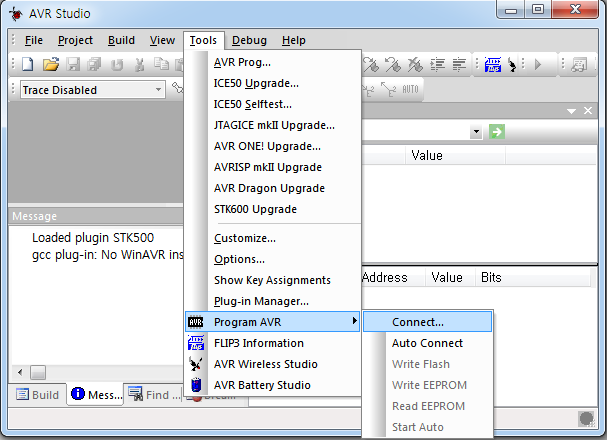
2. Select Tools -> Program AVR -> Connect..." menu item.
3. In the Select AVR Programmer dialog box, select your Platform (programming tool, for example, STK500 or AVRISP) and Port (Comport, for example, COM7) where your programming tool is connected.
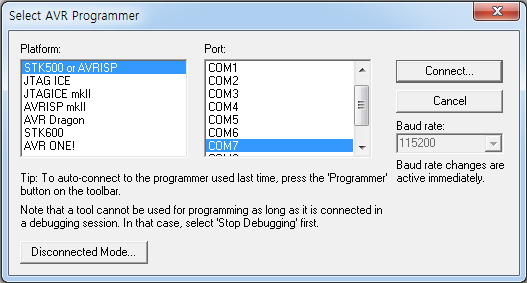
Click Connect button.
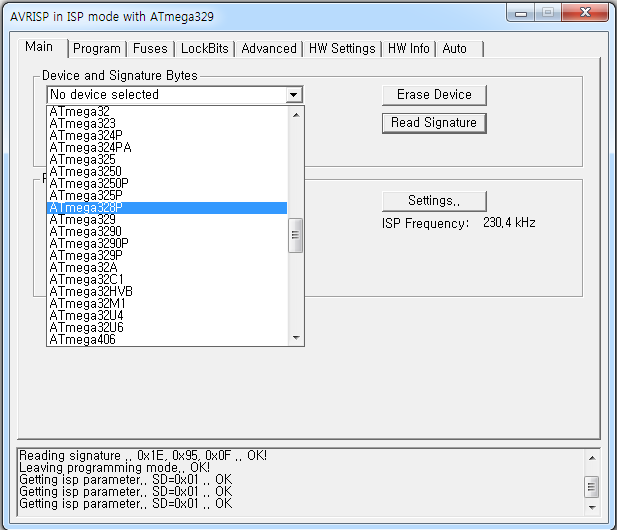
4. AVRISP in ISP mode with .... dialog box will be popped up.
Click Main tab.
In the Device and Signature Byte combox, select ATmega328P.
5. Connect STK500 (or AVRISP) 6-pin ISP cable connector to the 6-pin ICSP connector of the target Arduino Nano module to be programmed.
6. In the AVRISP in ISP mode with ATmega328P dialog box, click Read Signature button.
The device signature bytes, 0x1E 0x95 0x0F, will be dispalyed with a Signature matches selected device message below the Device and Signature Bytes combo box.
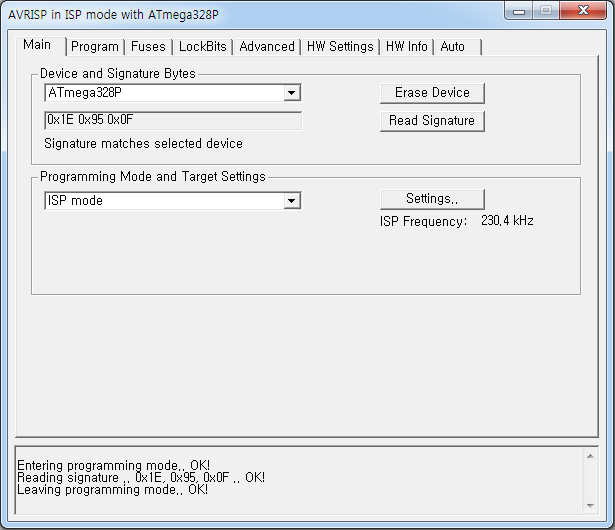
7. Click Fuses tab.
In the bottom box, check and edit three fuse values if needed as shown in the following picture.
| EXTENDED | 0xFF |
| HIGH | 0xDA |
| LOW | 0xF7 |
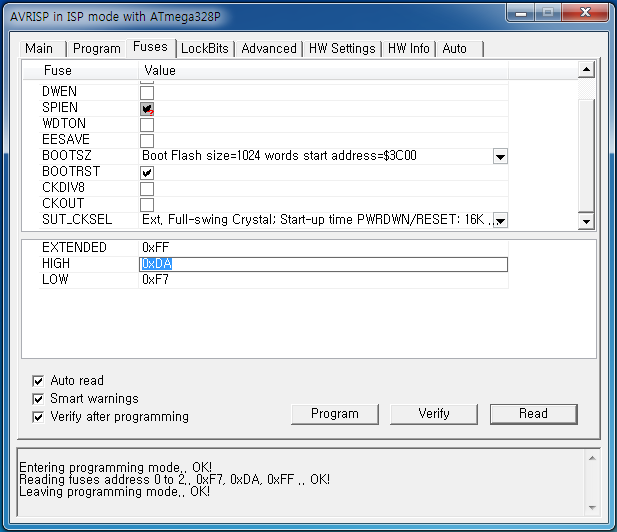
8. Program the three fuses by clicking the Program button. The dialog box will give you processing messages at the bottom of the dialog box.
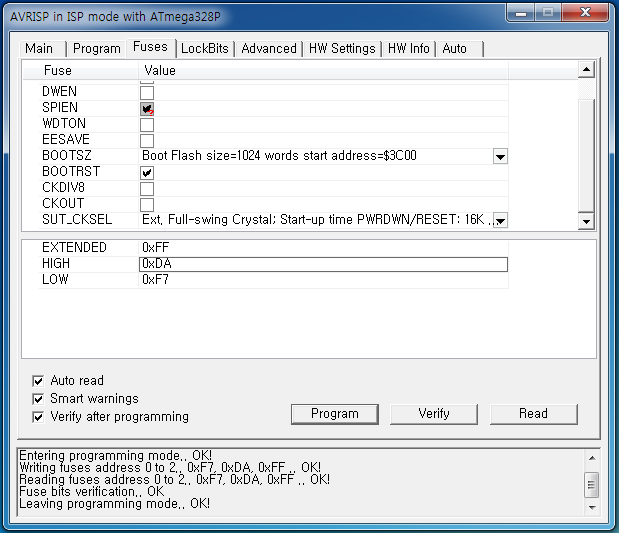
9. Click Program tab. In the Flash group box, select the bootloader hex file to be programmed to the Arduino Nano module. The bootloader hex file location and name are
-
Arduino_installed_folder\hardware\arduino\avr\bootloaders\atmega\ATmegaBOOT_168_atmega328.hex
10. Click Program button in the Flash group box. The dialog box will give you processing messages at the bottom of the dialog box.
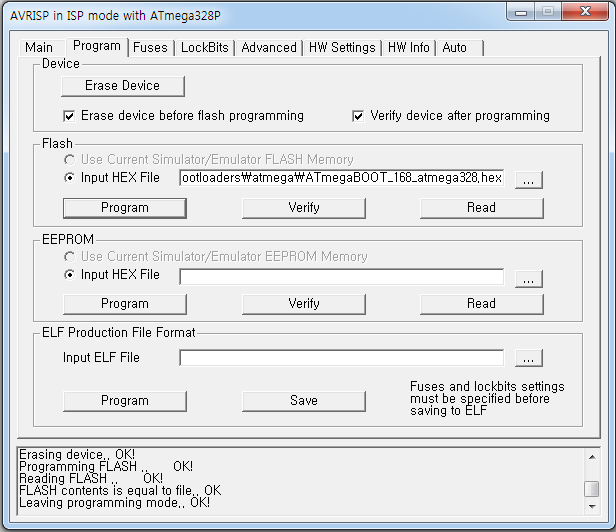
11. Close AVR Studio 4.
Programming the internal application flash memory area of ATmega328P
Now, it's time to program the internal application flash memory area of the ATmega328p that has the brand new bootloader. We will develop an application program in C language with AtmelStudio 6.2 and program the ATmega328P flash memory using avrdude 6.0.1 instead of Arduino IDE. The avrdude 6.0.1 is installed with Arduino IDE and its executable file location and name are
-
Arduino_installed_folder\hardware\tools\avr\bin\avrdude.exe
1. Start AtmelStudio 6.2 IDE.
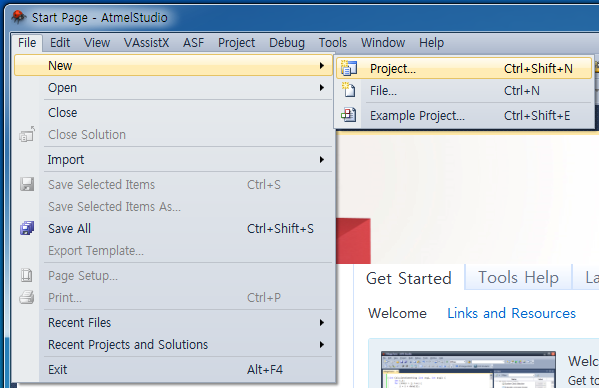
2. Select File -> New -> Project...menu item.
3. In the New Project dialog box, select C/C++ in the Installed Templates, select GCC C Executable Project, give the project Name and select your project folder Location.
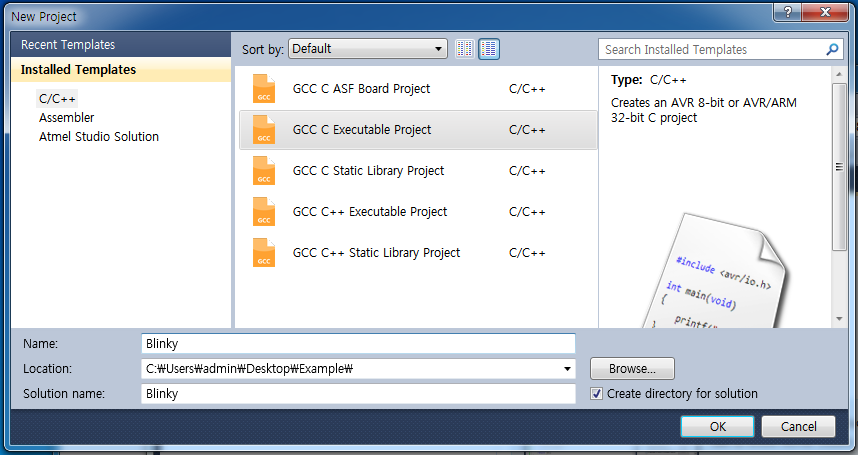
Click OK button to make a project.
4. In the Device Selection dialog box, select megaAVR, 8-bit in the Device Family combo box and select ATmega328P in the device list.
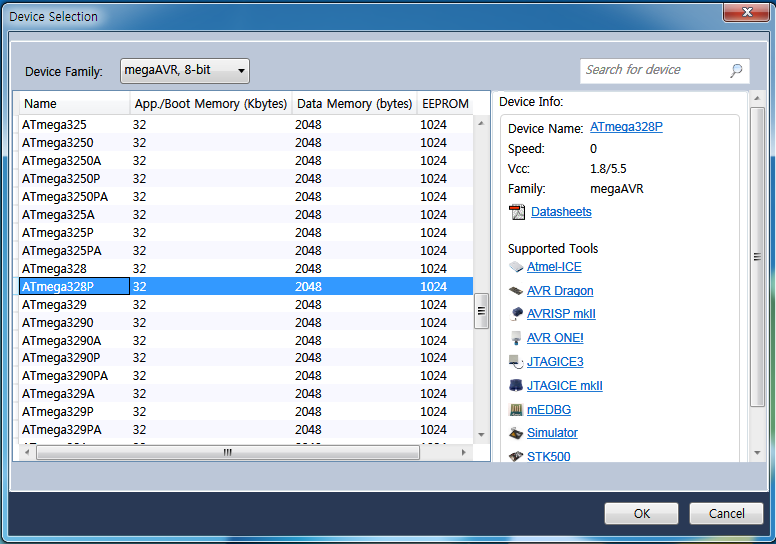
Click OK button once you selected the device.
5. In the Solution Explorer pane, click the current project name Blinky to expand the tree and click the source file name Blinky.c.
The source file pane Blinky.c will be shown in the left side. Make a simple program in C language, which toggles the LED connected to bit 5 of PORTB and transmits a simple message through the USART port.
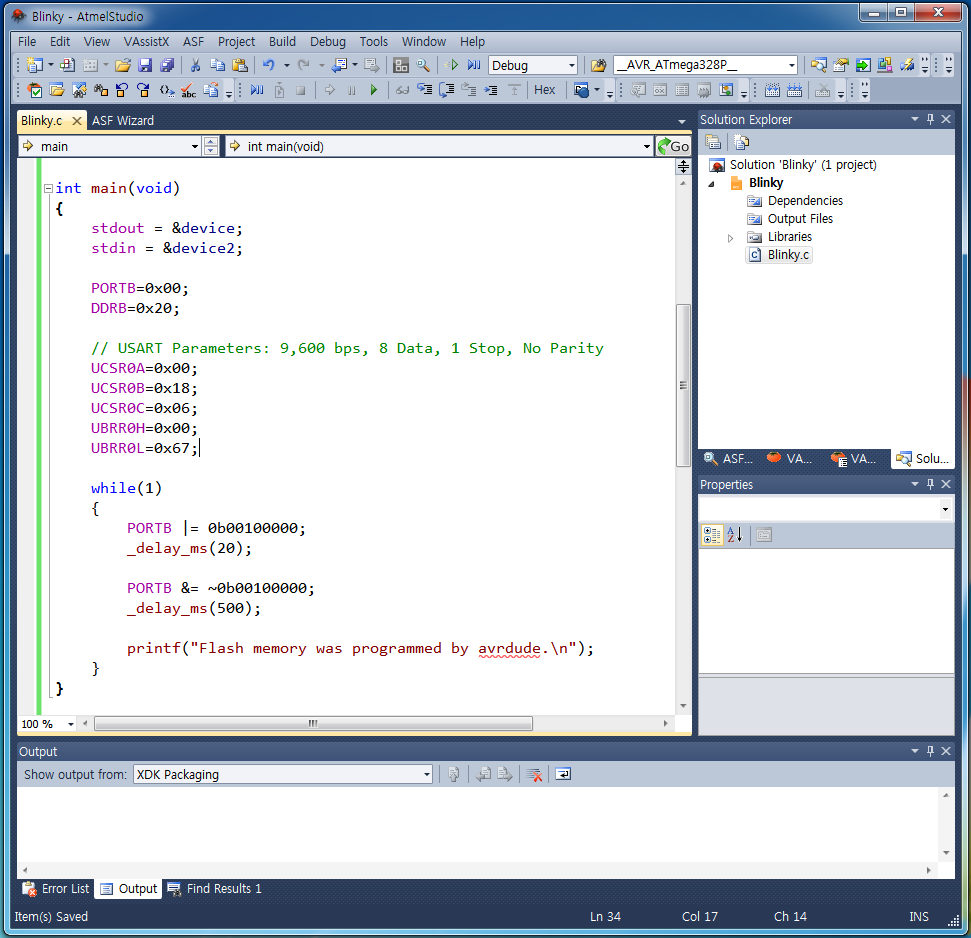
Example Program in C Language
/*
 * GccApplication1.c
 *
 * Created: 2015-03-17 오후 7:35:34
 *  Author: admin
 */

#define F_CPU 16000000UL  // 16 MHz

#include <stdio.h>
#include <avr/io.h>
#include <util/delay.h>

int TxChar(char data, FILE *stream);
char RxChar(FILE *stream);

FILE device = FDEV_SETUP_STREAM(TxChar, NULL, _FDEV_SETUP_WRITE);
FILE device2 = FDEV_SETUP_STREAM(NULL, RxChar, _FDEV_SETUP_READ);

int main(void)
{
	stdout = &device; //printf
	stdin = &device2; //getchar

	PORTB=0x00;
	DDRB=0x20;

	// USART initialization
	// Communication Parameters: 8 Data, 1 Stop, No Parity
	// USART Receiver: On
	// USART Transmitter: On
	// USART0 Mode: Asynchronous
	// USART Baud Rate: 9600
	UCSR0A=0x00;
	UCSR0B=0x18;
	UCSR0C=0x06;
	UBRR0H=0x00;
	UBRR0L=0x67;

    while(1)
    {
        PORTB |= 0b00100000;
        _delay_ms(20);

        PORTB &= ~0b00100000;
        _delay_ms(500);

        printf("Flash memory was programmed by avrdude.\n");
    }
}

int TxChar(char data, FILE * stream)
{
	while(!(UCSR0A & (1 << UDRE0)));
	UDR0 = data;
	return 0;
}

char RxChar(FILE * stream)
{
	while((UCSR0A & 0x80) == 0x00);
	return UDR0;
}
6. Click the Build Blinky icon or select Build -> Build Blink menu item to build the current project.
You can see a build success message after few seconds in the Output pane at the bottom side.
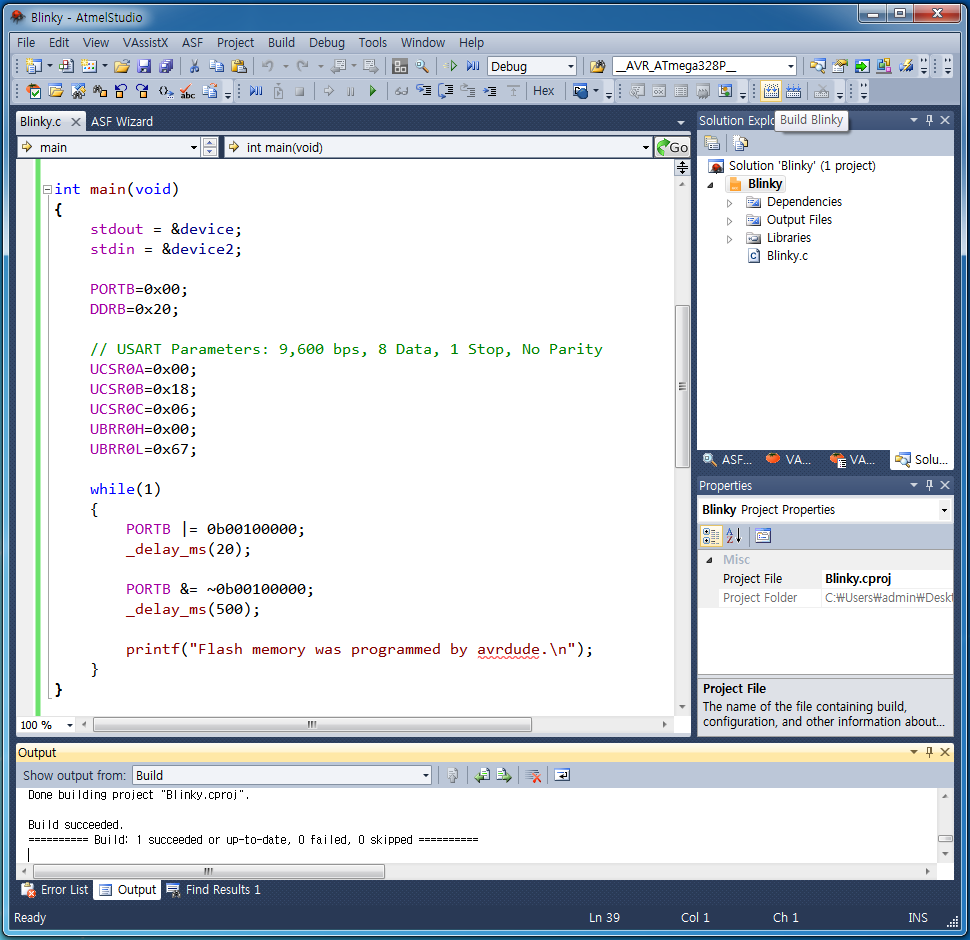
7. Connect the mini USB connector of the Arduino Nano module which has brand new bootloader to the PC using USB cable. Check the COM port number for the future.
avrdude needs one DLL file libusb0.dll and one configuration file avrdude.conf. All of these three files were installed when Arduino IDE was installed but each file is in different folders.
-
Arduino_installed_folder\hardware\tools\avr\bin\avrdude.exe
-
Arduino_installed_folder\hardware\tools\avr\etc\avrdude.conf
-
Arduino_installed_folder\libusb0.dll
For our convenience it is better to copy three files in one folder - in this example, these files were copied in the following folder.
-
C:\Users\admin\Desktop\Example\
Select Tools -> External Tools... menu item to let AtmelStudio 6.2 know that we are going to use avrdude as a programming tool.
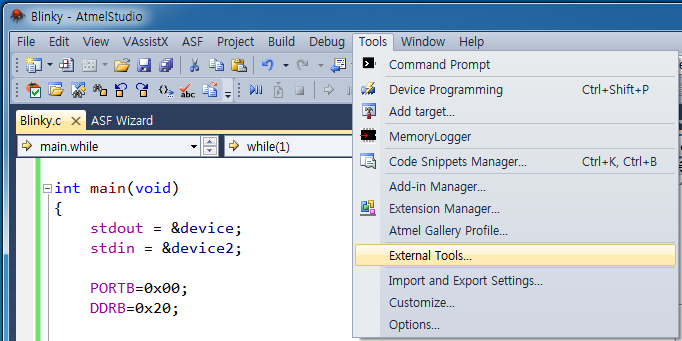
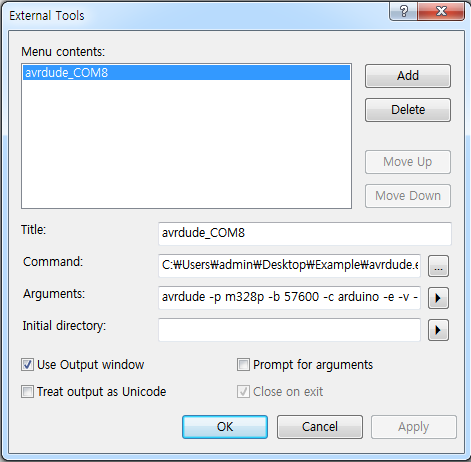
8. In the External Tools dialog box, enter your favorite avrdude nickname in the Title:, enter the whole path of avrdude.exe folder in the Command:, enter whole argument list needed for using avrdude in the Arguments:, check Use Output window and uncheck Treat output as Unicode.
-
Title: avrdude_COM8(or your favorite nickname)
-
Command: C:\Users\admin\Desktop\Example\avrdude.exe
(whole path name of the location where avrdude.exe is copied)
-
Arguments: avrdude -p m328p -b 57600 -c arduino -e -v -P COM8 -U flash:w:C:\Users\admin\Desktop\Example\Blinky\Blinky\Debug\Blinky.hex:i
Arduino Nano module is connected to COM8 port
whole path name of application's hex file
Click Apply button and click OK button.
9. Select Tools -> avrdude_COM8 menu item.
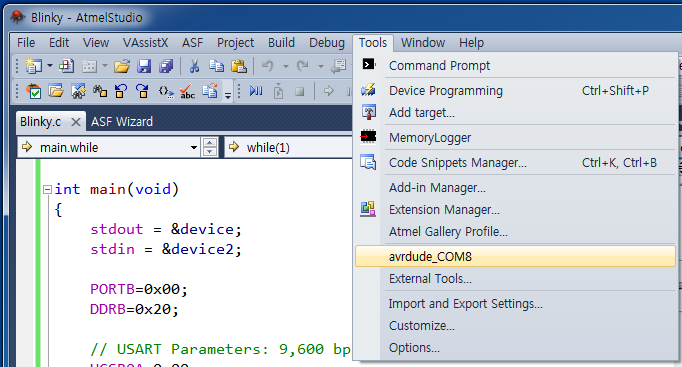
10. The application's hex file is downloaded to Arduino Nano module and programmed into the internal application flash memory area of ATmega328P.
You can check whether the downloading is OK or not by checking the messages displayed in the Output pane during dwonloading.
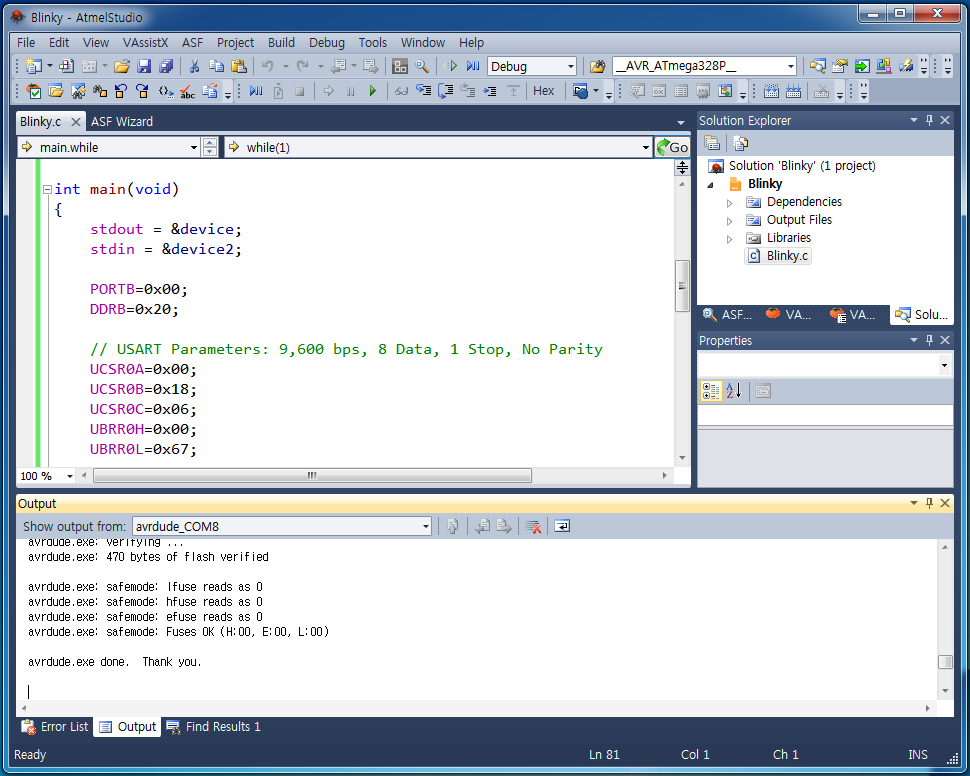
11. After downloading completed, you can see the LED is blinking and the message is displayed on Terminal program (9600, 8, N, 1).
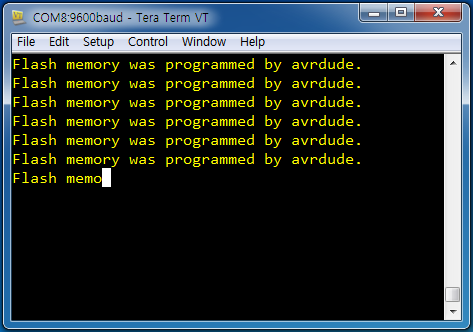
NOTE: The connection between Arduino Nano module and the Terminal program must be disconnected before re-programming because the COM port (in this example, COM8) is shared by AtmelStudio 6.2 and the Terminal program.
Congratulations!
